
Avensor Device FAQs
Γενικές ερωτήσεις για τη συσκευή
Προσαρμοσμένες συσκευές
- Μεταβείτε στο Διαχ. > Τύποι συσκευών > Προσθήκη.
- Καθορίστε τον τύπο συσκευής.
Απαιτούνται οι ακόλουθες παράμετροι:
Για περισσότερες πληροφορίες, ανατρέξτε στην ενότητα Ποιο είναι το μοντέλο δεδομένων και η πηγή δεδομένων για έναν προσαρμοσμένο τύπο συσκευής;
- Μεταβείτε στο Διαχ. > Τύποι συσκευών.
- Επιλέξτε τον τύπο συσκευής.
- Μεταβείτε στο Σημεία δεδομένων > Προσθήκη σημείου δεδομένων.
- Ορίστε τον τύπο δεδομένων.
α) Όταν επιλέγεται ο δυναμικός ή στατικός τύπος δεδομένων:- Ορισμός της Κατηγορίας 1
- Επιλέξτε την Υποκατηγορία 2
- Ορίστε τον Στόχο
- Μεταβείτε στην καρτέλα Πηγή
- Ορίστε την πηγή δεδομένων.
- Μεταβείτε στην καρτέλα Μονάδα και κλιμάκωση
- Ορίστε την αυξομείωση υπό κλίμακα των δεδομένων
Επιλέξτε τη μονάδα.
Όταν επιλεγεί η Κατάσταση κατηγορίας και η Εκτέλεση υποκατηγορίας, αφήστε το Λεπτομερές όνομα κενό για να εμφανιστεί η αντλία στο μοντέλο σταθμών.
Αν καμία από τις προκαθορισμένες κατηγορίες δεν ισχύει και για τα δύο σημεία δεδομένων, επιλέξτε Άλλο στο αναπτυσσόμενο μενού για την κατηγορία και προσθέστε ένα Λεπτομερές όνομα .
β) Όταν έχει επιλεγεί ο τύπος δεδομένων συναγερμού.
- Ρύθμιση του επιπέδου ενεργοποίησης
- Ορισμός προτεραιότητας συναγερμού
- Ορίστε τον Στόχο
- Προσθέστε ένα λεπτομερές όνομα . Είναι υποχρεωτικό να εισαγάγετε ένα λεπτομερές όνομα
- Μεταβείτε στην καρτέλα Πηγή
- Ορίστε την πηγή δεδομένων.
5. Κάντε κλικ στο κουμπί Αποθήκευση
1 Η κατηγορία ενός σημείου δεδομένων περιγράφει τον τύπο των δεδομένων που αντανακλά το σημείο δεδομένων
2 Η υποκατηγορία είναι μια βελτίωση της κατηγορίας
- Μεταβείτε στο Διαχ. > Τύποι συσκευών .
- Επιλέξτε έναν προσαρμοσμένο τύπο συσκευής.
- Μεταβείτε στην καρτέλα Σημεία δεδομένων.
- Εντοπίστε το σημείο δεδομένων που πρόκειται να αλλάξει την τοποθέτησή του.
- Κάντε κλικ και κρατήστε πατημένο το
 εικονίδιο για να σύρετε και να αποθέσετε το σημείο δεδομένων σε μια νέα τοποθέτηση.
Το Avensor αλλάζει τη σειρά των σημείων δεδομένων στα Ζωντανά δεδομένα.
Data model
The data points must be accurately defined for Avensor to show the data correctly.
| Parameter | Description |
| Dynamic Data | Live data from the device, for example the water level or input current This data is visible on the Live data page. |
| Static Data | Static data, for example the serial number or software version. This data is visible on the Device configuration page. |
| Alarms | Alarms from the device |
| Category | The data that is read from the data point, for example, speed, level, or power |
| Subcategory | The type of data, for example, maximum, reference, or input |
| Target | The source of the data, for example, the device, a machine, or an input on the device |
The following table shows examples of configurations for different data points.
| Data point | Parameter | Value |
| Pump running | Data type | Dynamic data |
| Category | Status | |
| Subcategory | Current level | |
| Target | Pump | |
| High level alarm | Data type | Alarm |
| Category | Level | |
| Subcategory | High | |
| Target | Input |
Data source
The data source is six numbers that represent the Modbus object type and location. The first number represents the object type.
| Number | Object type |
| 0 | Coil |
| 1 | Discrete input |
| 3 | Input register |
| 4 | Holding register |
The remaining five numbers represent a location from 1–65 535. If the location as less than five numbers, then zeroes are added before the location so that the data source has six numbers in total. When the data source is an individual bit, the data source uses the format register:bit, where the bit location is a number from 0–15. For example, 400102:0 is the bit in position 0 in the holding register 102.
- Go to Admin > Device types.
- Select a device type.
- Go to the Data points tab.
- Click the Add data point button.
- Go to the Source tab.
- Type the Modbus register followed by a colon.
The Size and order field is automatically set to BITMASK_16_BIT. - After the colon, type the bit or the bit range that is to be read. Use a dash to denote a range.
- Click Save.
Add :X to the register to get bit X, for example :1 for bit 1. Avensor recognizes this format as a bitmask.
Yes, in the Wet wells tab you can add all the wells you need for your device. You can then assign pumps and machines to each well. The station model is not available for stations with devices that have more than one wet well.
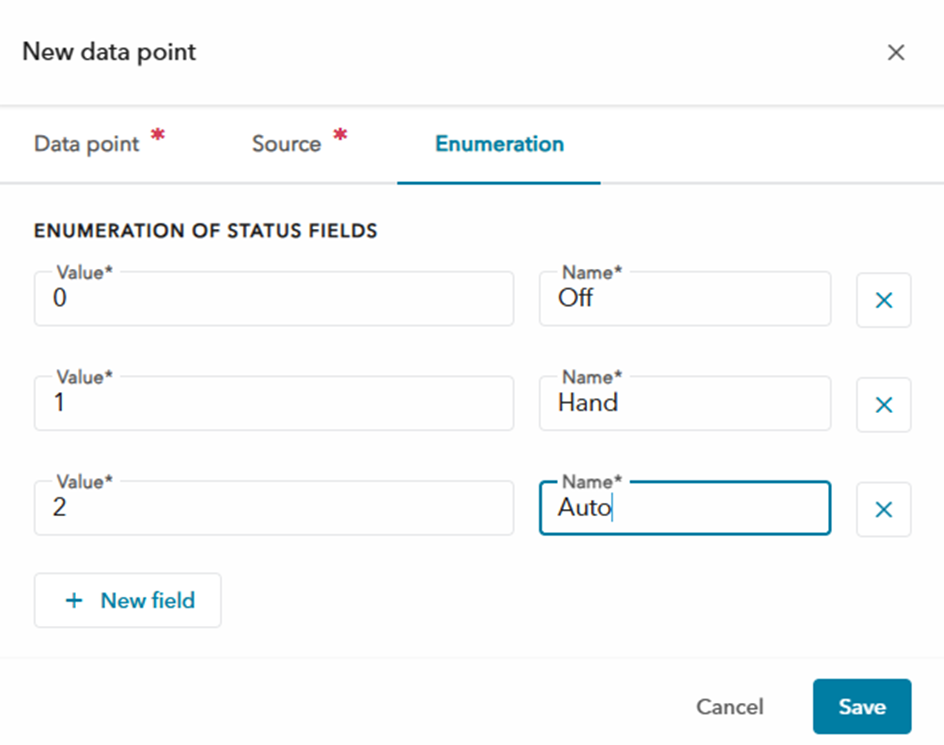
When you create a data point, set the category to Status. In the Enumeration tab you can now add the values and their corresponding names.
ATU
Contact support or the sales contact person.
- Connect to the ATU with the use of the software OPTWin.
- Click Hardware Definition.
- Below Modbus, click Go.
- In the field Output Mapping, find the Modbus address for the applicable port type and function code.
Example:

In the example, the Modbus base address for the digital inputs is set to 3000. The Modbus base address for the analog inputs is set to 10000.
Βρείτε τη διεύθυνση Modbus για τον κατάλληλο τύπο θύρας και κωδικό λειτουργίας.
- Προσθέστε 1 στη διεύθυνση.
- Εάν η διεύθυνση είναι τώρα ένας τετραψήφιος αριθμός, συνδέστε το 0 στην αρχή της διεύθυνσης.
- Συγκεντρώστε τον κωδικό αριθμό λειτουργίας στην αρχή της διεύθυνσης. Κάθε κωδικός λειτουργίας σχετίζεται με ένα ψηφίο με τον ακόλουθο τρόπο.
| Κωδικός λειτουργίας | Ψηφίο |
| Πηνία | 0 |
| Κατάσταση | 1 |
| Είσοδος | 3 |
| Διατήρηση | 4 |
Σχετικές συχνές ερωτήσεις: Πώς θα βρείτε τους αριθμούς βάσης Modbus στο OPTWin;
Παράδειγμα 1:
- Διεύθυνση Modbus: 2000
Κωδικός λειτουργίας: Διατήρηση - Προσθέστε 1 στη διεύθυνση: 2001
- Η διεύθυνση περιέχει τέσσερα ψηφία. Ενσωμάτωση 0 στην αρχή της διεύθυνσης: 02001
- Οριστικοποιήστε τον κωδικό αριθμό λειτουργίας στην αρχή της διεύθυνσης: 402001
Ο αριθμός Modbus είναι 402001 .
Παράδειγμα 2:
- Διεύθυνση Modbus: 15000
Κωδικός λειτουργίας: Είσοδος - Προσθέστε 1 στη διεύθυνση: 15001
- Η διεύθυνση περιέχει πέντε ψηφία. Δεν χρειάζεται να συνενώσετε το 0.
- Οριστικοποιήστε τον κωδικό αριθμό λειτουργίας στην αρχή της διεύθυνσης: 315001
Ο αριθμός Modbus είναι 315001 .
Aquavar
- Μεταβείτε στους σταθμούς .
- Επιλέξτε έναν σταθμό με συσκευή Aquavar.
- Μεταβείτε στις Συσκευές και κάντε κλικ στη συσκευή Aqauvar.
- Κάντε κλικ στην επιλογή Επεξεργασία .
- Στις πληροφορίες συσκευής , μεταβείτε στην ερμηνεία δεδομένων τιμής και αλλάξτε τη μονάδα πίεσης στη ράβδο ή στα psi.
- Κάντε κλικ στο κουμπί Αποθήκευση.
Ecotouch
Το EcoTouch υποστηρίζει 24 λαμπτήρες.
MyConnect
Avensor only supports reading if MyConnect is set to l/s and will present in that unit.
Nexicon
- Μεταβείτε στους σταθμούς .
- Επιλέξτε έναν σταθμό.
- Μεταβείτε στην επιλογή Συσκευές .
- Επιλέξτε τη συσκευή XAM 912 .
- Μεταβείτε στην καρτέλα Διαμόρφωση συναγερμών .
- Για τον ισχύοντα συναγερμό, κάντε κλικ στην επιλογή Επεξεργασία .
- Επεξεργαστείτε το πεδίο Όνομα .
- Κάντε κλικ στο κουμπί Αποθήκευση.
Remote Inspection Kit
- Finish the physical installation and power up the new Xylem Gateway unit.
- Go to DEVICES.
- Select the device type Remote Inspection Kit.
- Click the Replace button in the Upper-right corner.
- Fill in the new MAC address and click replace.
Enable Surface debris detection in Settings → Services.
Go to Devices → Camera → Image archive to see the snapshots.
How to take new snapshots:
- Go to OVERVIEW, click the three dots on the camera card to Refresh the snapshot.
- Go to Camera and click Refresh the snapshot.
- Go to DEVICES → Camera → Device configuration and click Refresh the snapshot.